product search
Indoor PlaygroundNinja WarriorOutdoor PlaygroundTrampoline
search

For grass or soil, you must use Corkscrew (Auger-style) Anchor Kits, screwing them at least 10–14 inches deep into the ground. Attach the straps to the upper circular frame (not the legs) to prevent separation. For concrete or patios, where you cannot drill, use Sandbags explicitly weighted to a minimum of 40 lbs (18kg) per leg. Place them over the bottom horizontal bars to utilize gravity as your anchor.
However, purchasing the right equipment is the first step. Most people overlook soil mechanics and wind resistance. Next, let me tell you some effective ways to tie down a trampoline.
To really lock a trampoline in the grass, the core principle you need is “friction”.
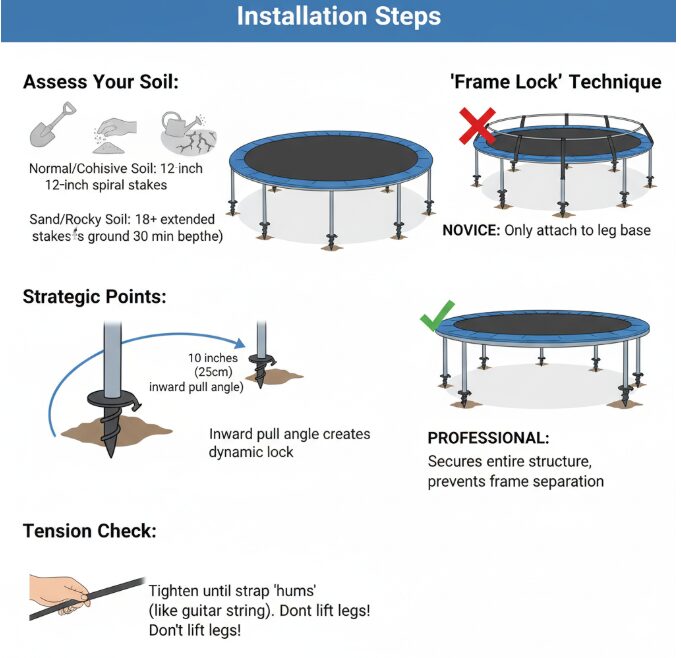
Installation steps:
The ground pegs were installed about 10 inches (about 25cm) inside the legs of the trampoline. This is done so that the straps form an inward pull angle. When the wind lifts the mattress up, this angle will make the straps tighter, forming a dynamic lock.
A common mistake for novices: only attach the straps to the leg base of the trampoline.
The professional’s practice: pass the ratchet strap directly around the circular main frame at the top.
Why? Because when strong winds hit, it can rip the entire upper frame off its legs. I ‘ve seen this scene where only a few legs are left standing there alone. So, by tying the main frame at the top to the ground, you’re fixing the whole structure.
Tighten the strap until it “hums” like a guitar string, but be careful not to push too hard and pull the trampoline legs off the ground.
On hardened ground that cannot be drilled, sandbags are your only option, and they are also very effective.
The best weight is 40 pounds: don’t ask me how I know, this is our empirical data from many years of testing. A minimum of 40 pounds (approximately 18kg) of weight is required for each leg. For a standard 4-leg trampoline, the total is 160 pounds (about 72 kilograms) of downforce.
What to use:
Place the sandbag flat on the horizontal bar at the bottom. I suggest using a couple of strong tape or nylon ties to secure it to prevent the sandbag from slipping off due to vibration when the children jump.
To be honest, even the best nails have a limit. If you’re facing a hurricane or extreme weather with winds exceeding 50 miles per hour (80 km/h), your trampoline is no longer a toy, it’s a giant sail. The wind will slam against the safety net and the bouncing mattress, creating a huge lift.
Here’s my ” Category 5 Storm Contingency Plan “:
| Ground Type | Best Method | Minimum Requirements | Professional Tips |
| Lawn/Clay | Spiral Ground Nail Kit | 4 ground nails (1 for each leg) | The straps should be fixed to the top frame, not just the legs. |
| Cement/yard | sandbags counterweight | 40 pounds per leg | with wet sand to increase density and weight. |
| Storm (50mph +) | Disassemble and remove | the safety net and trampoline mattress. | If the situation is urgent, you can turn the whole trampoline upside down and buckle it to the ground. |
About the Author mark
” With over 19 years as a licensed landscape contractor and backyard safety specialist, I’ve repaired countless fences damaged by flying trampolines during storm season. As a father and an outdoor pro, my mission is to bridge the gap between complex instruction manuals and real-world safety. I test the soil, the straps, and the anchors so you don’t have to guess—keeping your family safe and your backyard secure.”
This will close in 0 seconds