product search
Indoor PlaygroundNinja WarriorOutdoor PlaygroundTrampoline
search

To keep a trampoline from flying away, you must do two things immediately: cut off the wind resistance and increase the violence.
The safest long-term solution is to install spiral windproof ground nails, which must be drilled at least 12 inches (about 30cm) into the ground and deadlocked with heavy ratchet straps to the frame. But in reality, many people do not prepare anchoring kits in advance. If a storm is coming, your best solution now is to immediately hold down the trampoline legs (at least 40 pounds per leg, about 18 kilograms) with sandbags, tie the frame to fixed objects such as trees or fence piles with cargo straps, and—this is crucial—remove the safety net to eliminate the deadly “sail effect.”
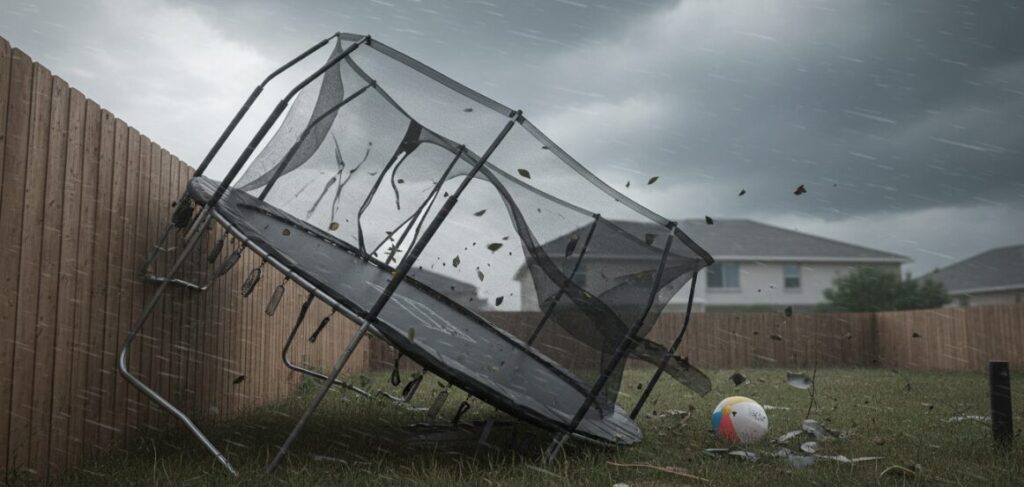
This is actually a simple physics problem: the jump mat plus the safety net constitutes a huge wind area.
In the industry, we call it the “Sail Effect.” This huge surface area will catch the wind and generate a strong enough lifting force to easily throw hundreds of pounds of metal frames across the yard. As I mentioned at the beginning, whether you are doing permanent reinforcement or temporary emergency, the core goal is only one: to combat this lift. Either the wind resistance is reduced by removing the net, or the “grip” created by the ground anchor and heavy objects is used to suppress it.
If you want to worry for a long time, it is absolutely not enough to rely solely on the gravity of the trampoline itself. The “ultimate weapon” to prevent the trampoline from flying away is to install an anchor kit with spiral ground nails.
Discover endless fun and spark imagination! Our indoor playground products create a safe, exciting paradise for children. Experience boundless joy now!
Embrace adventure and fresh air! Our outdoor playground products offer thrilling, safe experiences for kids to explore, play, and grow. Unleash the fun outside!
If the storm warning has been suspended and you don’t have an anchor kit on hand, don’t hesitate to go straight to the weight. The most accessible material is sandbags.
When the forecasted wind speed is extremely high, weighting alone may not be enough; we need physical mooring. See if you have any of those “motionless” things in your yard, like big, mature trees or concrete-poured fence piles.
Use cargo straps: Never use ordinary ropes or bungee cords; they will break like rubber bands under tension, which is very dangerous.
Wrap one end of the strap around the main metal ring of the trampoline.
The other end is fixed on the base of the tree root or fence pile.
Make sure that the angle of the strap is downward and pointing to the anchor point to maximize the limit of displacement.
Finally, this is the fastest operation to reduce risk, but it is often overlooked: changing the aerodynamic structure.
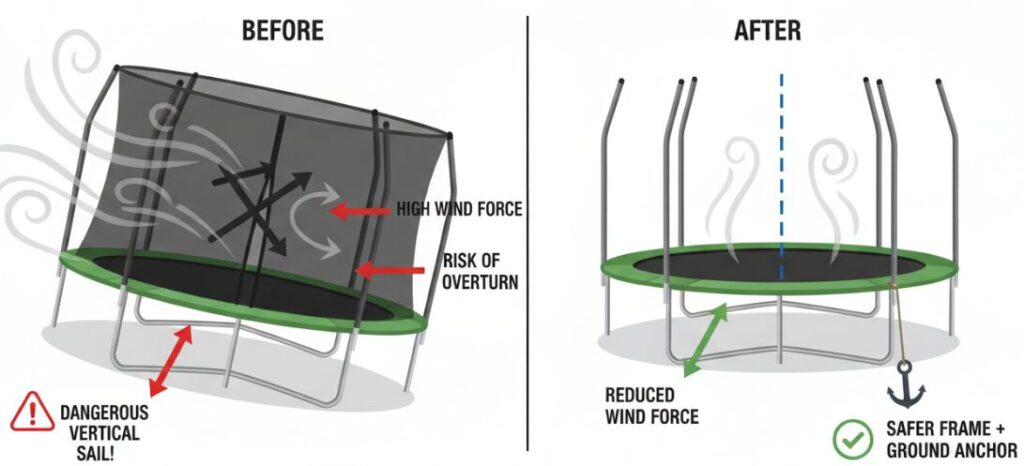
The safety net is essentially a vertical sail that will catch gusts of wind and overturn the trampoline. If high winds are imminent, take a few minutes to remove the safety net and put it in the house. This step can significantly reduce the area of wind force, allowing wind gusts to pass directly through the frame instead of lifting it up. Combining this step with a heavy object or ground anchor is your best line of defense against harsh tianqi111.
A: The most reliable solution is to install a spiral windproof ground nail kit. For maximum safety, the ground nails must be drilled at least 12 inches into the soil and tightly connected to the main frame of the trampoline using heavy ratchet straps.
A: If a storm is approaching and you don’t have anchors, immediately hold down the legs with sandbags (at least 40 pounds per leg) and tie the frame to a solid object such as a tree or fence pile with a cargo strap.
A: It must be removed. Removing the safety net is crucial because it eliminates the “sail effect”. The net surface will produce huge wind resistance and lift; removing it allows the wind to pass through more smoothly, greatly reducing the probability of trampoline take-off.
A: If you rely solely on gravity to resist high winds, you need at least 40 pounds (about 18 kilograms) of weight (such as sandbags) on each leg.
Author: Mark Stevens
Hi, I’m an Outdoor Safety Specialist dedicated to backyard security. With years of experience in equipment installation and storm preparation, I focus on practical, heavy-duty solutions—like deep-soil augers and proper weighting techniques—to ensure your outdoor gear stays grounded safely during severe weather.
This will close in 0 seconds