product search
Indoor PlaygroundNinja WarriorOutdoor PlaygroundTrampoline
search

To completely repair the hole in the trampoline, you must first evaluate the size of the hole.
If the hole is less than 1 inch, it can be fixed with high-quality anti-ultraviolet adhesive paste; If it is between 1 and 3 inches, the method of “reinforce-then-patch” must be used—that is, the edges are manually sewn with high-strength nylon thread to restore structural tension, then paste adhesive stickers on the front and back of the Mat.
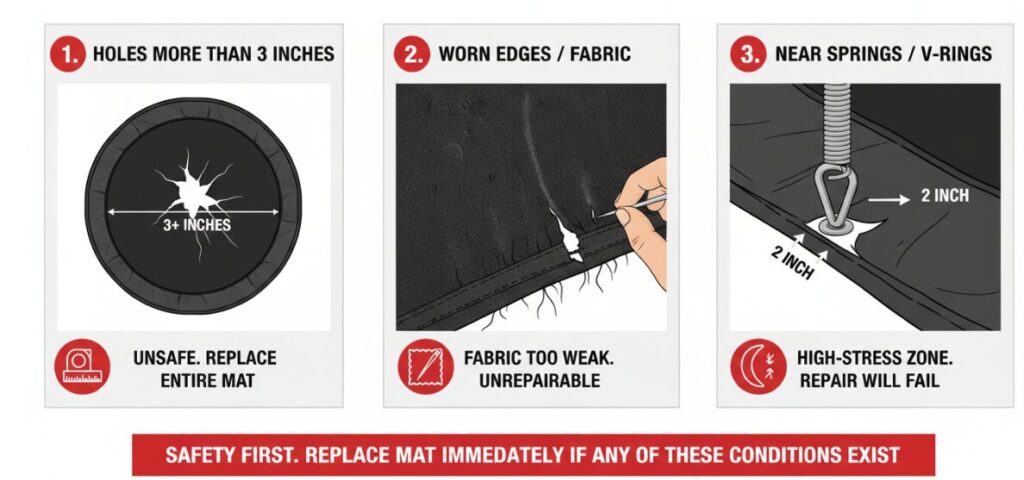
However, for safety reasons, if the hole is more than 3 inches, the edge is severely worn, or the hole is located less than 2 inches from the spring or V-ring, in this case the structural integrity has been damaged. Don’t think about repairing it, please replace the whole jumping noodle immediately.
For minor damage less than 1 inch (about the size of a 1 coin), the structure of the jumping surface is usually intact. At this time, our main goal is to prevent the hole from being hooked and further enlarged. A simple high-quality UV-resistant adhesive sticker is the standard solution.
Trampolines are usually exposed to direct sunlight. Too many people use ordinary tape or non-UV-resistant patches to repair, and as a result, under strong solar radiation, it will become brittle and fall off within a few days. You have to use a patch designed specifically for outdoor trampolines.
When the size of the hole is between 1 and 3 inches, it is not enough to rely on a sticker, because at this time the jumping surface has lost some of its tension ability. You must use the “first reinforcement and then repair” method, pulling the edges back by physical means, and then sealing.
Discover endless fun and spark imagination! Our indoor playground products create a safe, exciting paradise for children. Experience boundless joy now!
Embrace adventure and fresh air! Our outdoor playground products offer thrilling, safe experiences for kids to explore, play, and grow. Unleash the fun outside!
You have to stabilize the wound before you stick anything.
Once the tension is restored by suturing, the next step is to protect the sutures and seal the area.
Positive and negative application: glue stickers on the top and bottom of the jumping surface.
Sandwich effect: This creates a “sandwich” effect, locking the stitches in place and preventing moisture or debris from weakening the nylon thread. This two-layer approach ensures that the repair can withstand the dynamic impact of the jump.
Safety always comes first. Not all damage can be repaired. According to industry safety standards, if you encounter any 1 of the following three situations, you must stop using the trampoline and immediately replace the entire trampoline:
Yes, the repair is safe, but only if the damage is minor. For holes smaller than 1 inch, it is safe and effective to use high-quality UV-resistant adhesive stickers. For holes of 1 to 3 inches, it is only safe to use the “first reinforcement and then repair” method (first hand stitching with high-strength nylon thread, and then double-sided patching). If the hole exceeds 3 inches, the repair is no longer safe due to structural tension damage.
The absolute maximum repair size is 3 inches. According to the safety protocol, holes up to 3 inches can be repaired using the “reinforce before repair” method. However, once the hole exceeds 3 inches, the structural integrity is compromised and the pad must be replaced immediately.
For holes 1 to 3 inches, you must use high-strength nylon thread. This particular type of thread is necessary to restore the structural tension of the mat surface. Never use standard cotton or polyester threads, as they lack the strength to withstand the dynamic forces of the jump and may break, leading to repair failure.
It depends on the exact distance. If the hole is within 2 inches of the spring or V-ring, you cannot repair it. This peripheral area is subjected to the greatest pressure and tension. No patches or stitches can be safely held in this area, so the entire trampoline top must be replaced.
Author:Mark Stevens
I’m a certified trampoline safety specialist with over 15 years of experience in outdoor equipment maintenance. My guide focuses on practical DIY repairs, strictly adhering to safety standards to help you distinguish between minor fixes and critical structural risks, ensuring your family stays safe while jumping.
This will close in 0 seconds