product search
Indoor PlaygroundNinja WarriorOutdoor PlaygroundTrampoline
search

To move a trampoline short distances (such as across a yard) without disassembling it, the most structurally safe method is to create a low-friction barrier under the legs or use leverage wheels. Do not drag the trampoline directly on the ground, as the friction will bend the leg joints and compromise the frame’s integrity. Instead, follow this technician-approved protocol:
The vast majority of trampoline metal frame, is by vertical leg tube interface and T socket connection. These interfaces are designed to withstand vertical pressure (that is, the impact of a child jumping), but they have little resistance to lateral shear forces.
If you drag hard on grass or dirt:
(Best for grass, commonly known as the “sleigh method”)
This is the lowest threshold method, just find something at home can be done. If you’re moving on grass or smooth roads, I’m pushing this first.
Clear the route first. Make sure that there are no branches, stones, or watering hoses that tend to trip over slippery pads where the guard net passes. Find some squashed heavy-duty cardboard boxes, or that kind of furniture handling slide (furniture sliders). If you have a used pool noodles at home, cut the pad underneath.
Discover endless fun and spark imagination! Our indoor playground products create a safe, exciting paradise for children. Experience boundless joy now!
Embrace adventure and fresh air! Our outdoor playground products offer thrilling, safe experiences for kids to explore, play, and grow. Unleash the fun outside!
The trick is to directly change the physical form and turn the trampoline into a rolling wheel. Depending on the tools you have at hand, there are two ways to do it.
This video shows you how to move a trampoline using wheels:
Option A: Use Universal Trampoline Wheels (Recommended)
If you need to move the trampoline a lot (like mowing the grass every week), I sincerely recommend that you buy a universal trampoline wheel. This kind of wheel is directly stuck on the U-shaped leg, and when installed, even one or two people can easily push it away.
Scenario B: “Giant Wheel” Flip Method
If you don’t have wheels, you can also manually roll the trampoline on its side, but this job requires at least 4 adults.
(Best for short-range fine-tuning)
If you just want to move the trampoline to the edge of the fence by tens of centimeters, or straighten it out, pure human lifting is still the safest.
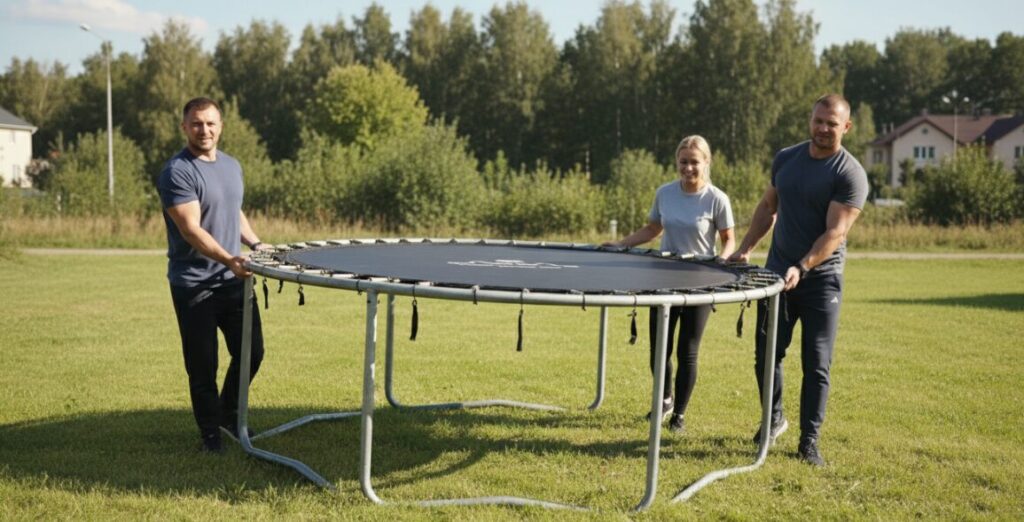
A standard trampoline typically has four to six U-shaped legs. There is a dead rule here: each leg brace must be equipped with an adult. If you want to save manpower, 3 one person to lift a four-legged trampoline, the frame will immediately twist. You know, the frame is twisted, the tension of the jumping pad is uneven, and the spring may even collapse directly.
Stand: Each person holds a leg brace.
Synchronization: Shouting a slogan (“1, 2, 3, up”) must be done at the same time.
Stay level: walk in step. It is essential to keep the trampoline parallel to the ground. If someone lifts high and someone lifts low, the weight distribution is off, either the person is injured or the frame is bent.
Author: Mark Stevens
“Hi, I’m a certified backyard safety specialist with over 15 years of experience in outdoor equipment assembly. I’ve helped hundreds of families set up and relocate their play areas. I hope to help you manage your backyard gear safely and efficiently without breaking a sweat—or your trampoline frame.”