product search
Indoor PlaygroundNinja WarriorOutdoor PlaygroundTrampoline
search

To take apart a trampoline safely and efficiently, start by wearing gloves and removing the safety net and poles. Next, unclip the blue safety padding to expose the springs. The most critical step is to remove the springs using a spring puller tool in a “12-6-3-9” clock pattern—removing opposites rather than consecutive springs—to evenly release tension and prevent the frame from warping. Finally, disassemble the metal ring and legs, using penetrating oil on any rusted joints, and immediately organize all hardware into labeled bags for easy reassembly.
Before hands-on disassembly, personal safety is absolutely the first. The thick working gloves are essential. The metal springs and frame of the trampoline have very sharp edges, which can easily pinch the skin or make large cuts. And, if you’re dealing with an old trampoline that’s been sitting outdoors for years, those rusty areas on it, touching it empty-handed is simply asking for trouble.
Having your tools ready in advance can make you do more with less. In addition to gloves, you mainly need these things: a spring hook tool (usually included when buying a trampoline, you should be able to find it through the toolbox at home), a screwdriver or wrench to match the frame bolts, and bottles of permeable lubricating oil.
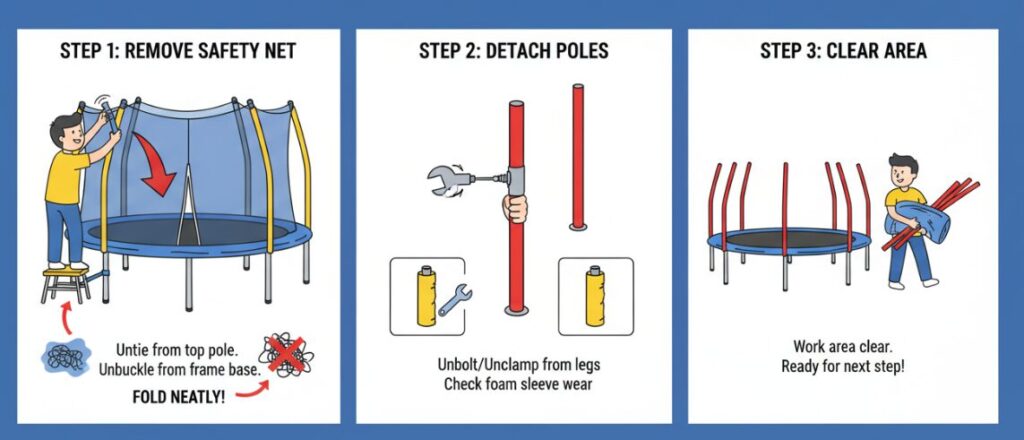
When fully equipped, the first structural component to be dealt with is the purse seine. Remove the safety net and poles and clear the workplace first.
About the net: Separate the net from the top of the pole, and then untie the buckle connected to the frame at the bottom. After removing it, fold it neatly and don’t lump it together, otherwise it will take half a day to photolyze the knot the next time you use it.
About poles: Most purse seine poles are bolted or clamped to the trampoline legs. Unscrew these fixings and pull the pole out. If the pole is covered with foam sleeve, check the wear and tear when disassembling it. If it is broken, just write it down and replace it with a new one next time.
Without the net, you have direct access to the mat area. Next, untie the blue safety pads that cover the perimeter so that the springs are fully exposed. This pad is usually used to prevent people from stepping into the spring gap injury, usually by elastic or Velcro fixed under the frame. Walk 1 circles along the edge of the trampoline and untie all the ties. After loosening, remove the pad directly. This step cannot be lazy. If the entire mechanical structure is not completely exposed, the subsequent disassembly cannot be started at all.
The most critical operation is to use the spring hook to remove it according to the clock mode of “12-6-3-9.
Never follow the circle one by one (continuous disassembly). This will cause the tension on one side of the trampoline to be extremely unbalanced. The huge pulling force may instantly bend, twist, or even directly break the metal frame and hurt people. Instead, you should use this method to evenly release the tension:
12 o’clock: First remove the spring in the “top” position.
6 o’clock: Go directly to the opposite side and remove the 1 root.
3 o’clock and 9 o’clock: Move to both sides and remove the opposite pair of springs.
Fill the vacancy: continue to follow the principle of “removing the opposite side” instead of “removing the next door” until all tension is released and the jumping mat is completely released.
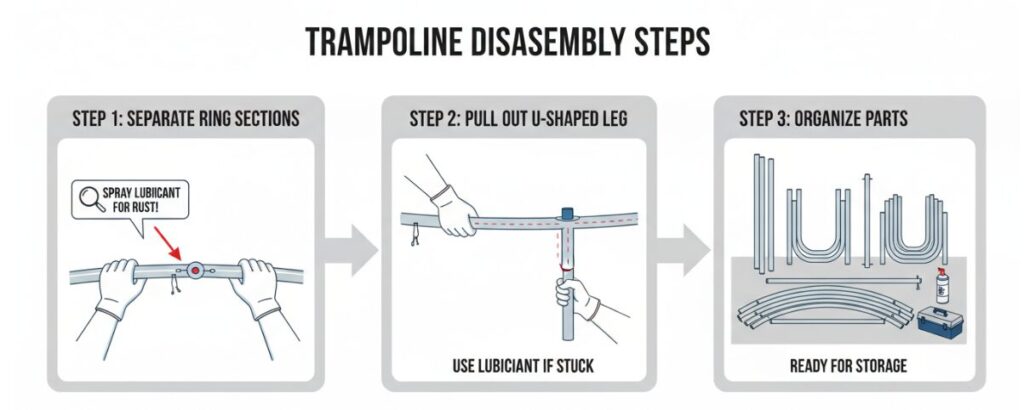
Once the jumping mat and springs are removed, you are left with only trampoline skeleton. The final step is to take apart the metal ring and legs. At this time, you may encounter some trouble-if the trampoline is exposed to the wind and rain for too long, the interface may be stuck to death.
Dealing with rust: If some frames can’t be pulled out, penetrating lubricating oil is your savior. Spray a lot of oil into the connection gap and let it sit for a few minutes. This lubricates the metal and destroys the rust layer, making it easier for the pipe to slide open.
Split the frame: first pull the circular ring part apart, and then pull the U-shaped leg out of the socket.
This last step is often overlooked, but it determines whether you will be relaxed or crazy when you reinstall the trampoline in the future. When you remove the bolts, screws, and caps, immediately sort them into labeled bags.
Don’t throw scattered piles of screws into a big box and wander around. Trust me, find a few self-sealing bags and clearly write “leg bolts”, “network card buckle” or “spring hook” with a marker “. You can tape these bags directly to the corresponding parts, or put them into a special “trampoline parts box. This organized storage habit, when you decide to put the trampoline back up next time, you will thank yourself for saving a lot of time now.
Author:Mark Stevens
I am a backyard recreation specialist with over 10 years of experience in outdoor equipment assembly. I have helped hundreds of families safely install, maintain, and disassemble trampolines and playsets.