If you want to level the trampoline completely, there are two ways: either dig out the high soil to reduce the height of the frame, or use special trampoline leveling blocks under the low legs to pad it up. No matter which of these two methods is chosen, the core purpose is to ensure that each leg has a solid and even support, prevent dangerous shaking, and ensure the consistency of resilience.
Of course, if you are facing a steep slope, simple elevation may not be enough. You have to use 2x 4 wooden squares and stakes to make an extended “artificial leg” . Remember, no matter how big your movements are, you must use a woodworking level to confirm the stability repeatedly.
The Importance Of Leveling The Trampoline
A trampoline on uneven ground is not just an eyesore; it is a safety hazard.
Uneven rebound: If the pad surface is inclined, gravity will naturally pull the jumper to the lowest edge. Jumping and jumping people are deflected, and it is easy to fall out or hit the spring.
Frame Stress: Unequal weight distribution can put excessive torque on metal joints. Too many cases of leg bending and even direct collapse of solder joints due to lack of leveling over time.
Instability: If the base is wobbly, the entire structure may shift or even tip over during severe jumps or strong winds.
Assessing Your Slope
Before you pick up a shovel or place an order for a pad, you need to figure out exactly how much you need to level it. Don’t just use your eyes to estimate.
Position: Put the frame where you want it to be.
Upper level: find a long board across the trampoline frame, from the high side to the low side. Put the carpentry level on top of the board.
Measure the gap: Lift the lower end of the board until the bubble in the level is centered. At this time, measure the vertical distance between the board and the lower frame. This number is the exact size you need to dig deep (high) or pad high (low).
Method 1: The Trenching Technique
Best for: Homeowners who want a permanent, stable solution and don’t mind altering their lawn.
Specific steps:
Marking position: After the trampoline is set, mark the U-shaped legs that sit too high and need to sink on the ground.
Remove and excavate: remove the trampoline. Dig the trench at the marked place, and the depth should strictly correspond to the slope difference you just measured.
Test and adjustment: Put the trampoline legs into the ditch. Check the frame again with the level. If it’s not perfect, shovel some more of the soil off little by little.
Fix the legs: Once leveled, backfill a little soil and tread around the buried pipe. This increases stability and prevents the legs from running around in the ditch.
Pro Tip: If you live in a place where there is a lot of rain, I strongly recommend laying a layer of small gravel at the bottom of the ditch. This helps drain water and prevents long-term accumulation of water from rusting the trampoline legs-something I ‘ve done a lot of, don’t be careless.
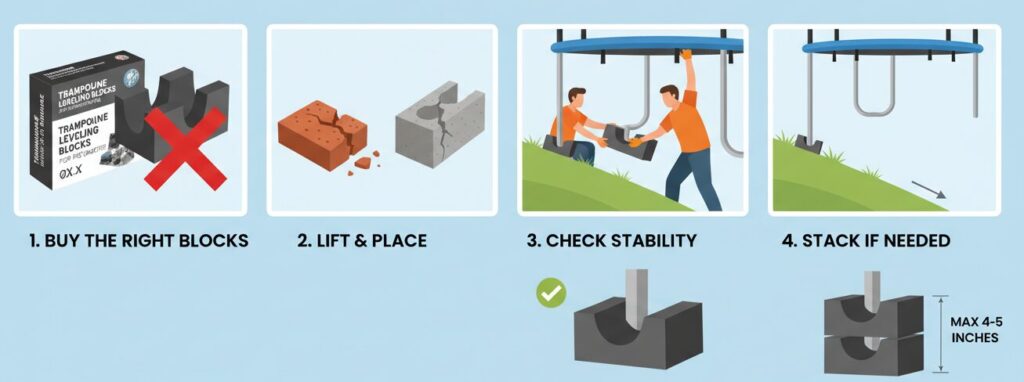
Method 2: Using Leveling Blocks
Best for: Renters, temporary setups, or mild slopes where digging isn’t an option.
Specific steps:
Buy the right thing: look for “trampoline leveling blocks” designed specifically for your trampoline pipe diameter “. Don’t just find two red bricks or hollow bricks to pad, it is easy to crack under the impact of violent jumping, which is very dangerous.
Lift and place: Find a helper to lift the low side of the trampoline and you slide the pad under your leg.
Check the stability: Make sure that the U-shaped leg is fully seated in the groove of the leveling block.
Stacking when necessary: Some brands allow you to stack the blocks to the desired height. However, don’t fold it too high (usually no more than 4-5 inches), it is too high and the center of gravity is unstable.
Best for: Slopes that are too steep for simple trenching or standard blocks.
Specific steps:
Measuring the drop: Determine how high the low leg needs to be to be level with the high.
Cut anticorrosive wood: cut 2x 4 anticorrosive wood (pressure-treated lumber) and make a wide base or similar “sled” platform for the lower legs.
Build extensions: You can make a wooden box or raise the base to hold the metal legs firmly. Note that the top of the wooden extension must have ribs or slots to prevent the metal legs from slipping off.
Piling and fixing: This step is crucial. Pass long metal threaded rebar or stakes through your wooden extension, drive deep into the ground, and lock it up. This extension must not have the possibility of sliding down the slope.
Cross supports: If the extensions are relatively high (more than 6 inches), add diagonal cross supports between the wooden feet to prevent them from bending sideways.
Final Safety Check
No matter which method you use, you must finally anchor the trampoline to the ground. Leveling only solves the gravity problem, but it can’t stop the wind from overturning the mat.
Use spiral ground nails: Thread them deeply into the soil.
Use a ratchet strap: Connect the frame tightly to the ground nail.
Review the level: after anchoring, put the level back on the frame for the last time. Because the tension of tightening the strap sometimes pulls the originally flat shelf askew, this step cannot be saved.
Author:Bill
“Hi, I’m a backyard safety enthusiast and DIY landscape specialist. With over a decade of experience in outdoor equipment installation, I focus on practical, hands-on solutions to help families transform uneven yards into safe, fun play zones.
Expand more!
Welcome
Demo Description
Send Us a Message
Creating the Playground of Children’s Dreams
Please leave your contact details, and our professional consultants will provide you with a complimentary site measurement and 3D design proposal.
Send Us a Message
Please fill in your email address, and our manager will contact you to confirm your mailing address and mail you samples and material certificates (MSDS/COA) free of charge.